Skip to content

widgets

Description

This module contains classes (QtWidgets) and functions managing the user interfaces used by openhdemg.library. These classes or functions can be used directly or integrated in larger UIs (e.g., MU tracking and conduction velocity estimation).


check_app()

Check if a QApplication instance already exists and return needed objects.

Ensures that a QApplication is available before launching any Qt-based GUI. If no instance exists, a new one is created with the 'Fusion' style applied. This is useful for ensuring compatibility in environments where a QApplication may already be running (e.g., Qt apps).

Check the implementation of run_point_selector() to see how it can be used.

RETURNS DESCRIPTION
app

The active or newly created QApplication instance.

TYPE: QApplication

app_created

True if a new QApplication was created, False if one already existed.

TYPE: bool

path_to_icon

Path to the openhdemg icon.

TYPE: str


PointSelectorDialog

Bases: QDialog

Interactive dialog for selecting points on a 1D signal.

It shows a Matplotlib figure in a Qt dialog. The dialog ensures the number of selected points matches the required count (if specified) before closing.

Users can move the mouse to track coordinates and press:

- "A" or "a" to add a point at the current cursor location
- "D" or "d" to delete the last selected point
- "Enter" to confirm the selection and close the window

Check the implementation of run_point_selector() to see how it can be used. It is always suggested to call the PointSelectorDialog from run_point_selector() instead of directly running its instance, as this is also managing the QApplication.

PARAMETER DESCRIPTION
data

1D signal to display for point selection. This can be anything suitable for matplotlib.axes.Axes.plot.

TYPE: array - like

nclic

Number of points to enforce selection before confirming. Default is -1, which means no limit.

TYPE: int DEFAULT: -1

y_label

Label for the y-axis.

TYPE: str DEFAULT: "Data"

title

Title shown above the plot.

TYPE: str DEFAULT: "A to select, D to delete, Enter to continue"

title_fontsize

Font size of the title.

TYPE: int or float DEFAULT: 10

title_fontweight

Font weight of the title text. This will be passed to matplotlib.text.Text.set_fontweight.

TYPE: str DEFAULT: "bold"

path_to_icon

The path to the window icon. Use none if this widget inherits from a parent.

TYPE: None or str DEFAULT: None

ATTRIBUTE DESCRIPTION
points

A list of Lists containing the [x, y] coordinates of the selected points.

TYPE: list of lists

See also
  • run_point_selector : Run the point selector dialog and return the selected points.

on_mouse_move(event)

Record mouse position on the figure coordinates.

on_key_press(event)

React to pressed buttons.

redraw_points()

Update the figure with the selected points.


run_point_selector(data, nclic=-1, y_label='Data', title='A to select, D to delete, Enter to continue', title_fontsize=10, title_fontweight='bold')

Run the point selector dialog and return the selected points.

Opens a blocking Qt dialog where the user can select points on a 1D signal using keyboard and mouse interactions. The dialog ensures the number of selected points matches the required count (if specified) before closing.

Compared to directly creating a PointSelectorDialog instance, this function automatically manages the app integration for the user.

Users can move the mouse to track coordinates and press:

- "A" or "a" to add a point at the current cursor location
- "D" or "d" to delete the last selected point
- "Enter" to confirm the selection and close the window
PARAMETER DESCRIPTION
data

1D signal to display for point selection. This can be anything suitable for matplotlib.axes.Axes.plot.

TYPE: array - like

nclic

Number of points to enforce selection before confirming. Default is -1, which means no limit.

TYPE: int DEFAULT: -1

y_label

Label for the y-axis.

TYPE: str DEFAULT: "Data"

title

Title shown above the plot.

TYPE: str DEFAULT: "A to select, D to delete, Enter to continue"

title_fontsize

Font size of the title.

TYPE: int or float DEFAULT: 10

title_fontweight

Font weight of the title text. This will be passed to matplotlib.text.Text.set_fontweight.

TYPE: str DEFAULT: "bold"

RETURNS DESCRIPTION
points

A list of Lists containing the [x, y] coordinates of the selected points.

TYPE: list of lists

Examples:

Free selection of points (no limit)

>>> import numpy as np
>>> from openhdemg.ui import run_point_selector
>>> signal = np.sin(np.linspace(0, 10, 500))
>>> selected_points = run_point_selector(signal, nclic=-1)
>>> print(selected_points)
[[70.22, 0.96], [222.14, -0.95], [314.93, 0.04]]

Select exactly 2 points and print the X coordinates.

>>> import numpy as np
>>> from openhdemg.ui import run_point_selector
>>> signal = np.random.randn(1000)
>>> selected = run_point_selector(signal, nclic=2)
>>> print(f"Start: {selected[0][0]}, End: {selected[1][0]}")
Start: 168.21717572391907, End: 713.5261404204681


CustomFileDialog

Custom file dialog for opening or saving a file.

It uses QSettings to remember the last accessed directory.

Check the implementation of run_custom_file_dialog() to see how it can be used. It is always suggested to call the CustomFileDialog from run_custom_file_dialog() instead of directly running its instance, as this is also managing the QApplication.

PARAMETER DESCRIPTION
mode

Operation mode for the dialog.

open Get the file path to load the selected file.

save Get the file path where to save the selected file.

TYPE: str {"open", "save"} DEFAULT: "open"

filesource

Description of the file type being handled. This is shown in the dialog title.

TYPE: str DEFAULT: "file"

filetypes

A list of (description, extension) tuples specifying acceptable file types.

TYPE: list of tuples DEFAULT: [("openhdemg files", "*.json"), ("All files", "*.*")]

METHOD DESCRIPTION
get_filepath

Get the path to the file or None if the operation is cancelled.

See also
  • run_custom_file_dialog : Opens a custom file dialog for opening or saving a file.

get_filepath()

Get the path to the file.

If the operation is completed, the directory is memorised for following uses.

RETURNS DESCRIPTION
str or None

The selected file path if confirmed, or None if the dialog was canceled.


run_custom_file_dialog(mode='open', filesource='openhdemg', filetypes=[('openhdemg files', '*.json'), ('All files', '*.*')])

Opens a custom file dialog for opening or saving a file, remembering the last accessed directory.

Compared to directly creating a CustomFileDialog instance, this function automatically manages the app integration for the user.

PARAMETER DESCRIPTION
mode

Operation mode for the dialog.

open Get the file path to load the selected file.

save Get the file path where to save the selected file.

TYPE: str {"open", "save"} DEFAULT: "open"

filesource

Description of the file type being handled. This is shown in the dialog title.

TYPE: str DEFAULT: "openhdemg"

filetypes

A list of (description, extension) tuples specifying acceptable file types.

TYPE: list of tuples DEFAULT: [("openhdemg files", "*.json"), ("All files", "*.*")]

RETURNS DESCRIPTION
str or None

The selected file path if confirmed, or None if the dialog was canceled.

Examples:

Get the path to a MATLAB file and visualise the full path, the file name and its directory.

>>> from openhdemg.ui import run_custom_file_dialog
>>> import os
>>> filepath = run_custom_file_dialog(
...     mode="open",
...     filesource="MATLAB",
...     filetypes=[("MATLAB files", "*.mat"), ("All files", "*.*")]
... )
>>> if filepath:
...     filename = os.path.basename(filepath)
...     directory = os.path.dirname(filepath)
...     print("Full path:", filepath)
...     print("File name:", filename)
...     print("Directory:", directory)
... else:
...     print("No file was selected.")


CustomDirectoryDialog

Custom dialog for selecting a directory.

It uses QSettings to remember the last accessed directory.

Check the implementation of run_custom_directory_dialog() to see how it can be used. It is always suggested to call the CustomDirectoryDialog from run_custom_directory_dialog() instead of directly running its instance, as this is also managing the QApplication.

PARAMETER DESCRIPTION
window_title

Title of the dialog window. This should guide the user.

TYPE: str DEFAULT: "Select a folder"

METHOD DESCRIPTION
get_directory

Get the directory path.

See also
  • run_custom_directory_dialog : Opens a custom dialog for selecting a directory.

get_directory(mode='open')

Get the directory path.

Allows selecting an existing directory or typing a new one. The new directory is created automatically if needed.

PARAMETER DESCRIPTION
mode

Determines how the dialog behaves:

open The dialog is used to select an existing directory. The user must choose a folder that already exists on the filesystem.

save The dialog additionally allows the user to type a new directory name into the text bar. If the typed directory does not exist, it will be created automatically after the user confirms.

TYPE: str {"open", "save"} DEFAULT: "open"

RETURNS DESCRIPTION
str or None

The selected or created directory path.


run_custom_directory_dialog(window_title='Select a folder', mode='open')

Opens a custom dialog for selecting a directory, remembering the last accessed directory.

Compared to directly creating a CustomDirectoryDialog instance, this function automatically manages the app integration for the user.

PARAMETER DESCRIPTION
window_title

Title of the dialog window. This should guide the user.

TYPE: str DEFAULT: "Select a folder"

mode

Determines how the dialog behaves:

open The dialog is used to select an existing directory. The user must choose a folder that already exists on the filesystem.

save The dialog additionally allows the user to type a new directory name into the text bar. If the typed directory does not exist, it will be created automatically after the user confirms.

TYPE: str {"open", "save"} DEFAULT: "open"

RETURNS DESCRIPTION
str or None

The selected directory path if confirmed, or None if the dialog was canceled.

Examples:

Select a directory and print the path:

>>> from openhdemg.ui import run_custom_directory_dialog
>>> dirpath = run_custom_directory_dialog(
...     window_title="Select the output folder"
... )
>>> if dirpath:
...     print("Selected directory:", dirpath)
... else:
...     print("No directory was selected.")


Manual_EMGChannels_Selection_Dialog

Bases: QDialog

Modal dialog for manual selection of noisy EMG channels.

The dialog displays stacked EMG channels for visual inspection and allows the user to mark channels as valid or invalid using the keyboard (keys 1-8). Selected channels are stored in the GOOD_CHANNELS field of the EMG file upon confirmation.

PARAMETER DESCRIPTION
emgfile

The dictionary containing the emgfile.

TYPE: dict

manual_offset

Vertical spacing between channels. If 0, an automatic offset is computed from signal amplitude.

TYPE: float DEFAULT: 0

path_to_icon

Path to a window icon file.

TYPE: str or None DEFAULT: None

parent

Parent widget.

TYPE: QWidget or None DEFAULT: None

get_emgfile_with_good_channels()

Return a deepcopy the EMG file with updated GOOD_CHANNELS metadata.

Channel indices are stored as strings for saving compatibility.


run_manual_emgchannels_selection_dialog(emgfile, manual_offset=0)

Select noisy channels via visual inspection.

This function opens a modal graphical dialog that allows the user to visually inspect stacked EMG channels and mark noisy or unwanted channels. Channel selection is performed interactively; the calling code is blocked until the dialog is closed.

Compared to directly creating a Manual_EMGChannels_Selection_Dialog instance, this function automatically manages the app integration for the user.

PARAMETER DESCRIPTION
emgfile

The dictionary containing the emgfile.

TYPE: dict

manual_offset

This parameter sets the scaling of the channels. If 0 (default), the channels' amplitude is scaled automatically to fit the plotting window. If > 0, the channels will be scaled based on the specified value.

TYPE: int or float DEFAULT: 0

RETURNS DESCRIPTION
edited_emgfile

The EMG file dictionary with an updated "GOOD_CHANNELS" entry (mapping channel indices as strings to booleans) if the user confirms the selection. Returns None if the dialog is cancelled.

TYPE: dict or None

Examples:

See emg.select_bad_channels()


BSS_MU_Editor

Bases: QDialog

Portable modal UI for cleaning MU discharge selections obtained via convolutive blind source separation.

Prefer calling this widget through run_bss_mu_editor() instead of instantiating it directly. The runner handles the Qt application setup and returns the edited EMG file together with the MU indexes marked for deletion.

Advanced MU cleaning

Please note that the most advanced MU cleaning tools are available in the openhdemg software. You can find it at:

https://www.giacomovalli.com/openhdemg_software/

This UI allows to:

  • visually inspect the blind source separation discharge time selection.
  • visually inspect the source separation.
  • to add and delete firings.
  • mark MUs to delete.
  • update the separation filter based on the manually selected discharge times.

All the actions can be performed using the following shortcuts:

  • A: Toggle rectangular add mode. Samples of the selected IPTS trace inside the rectangle are added to the current MU discharge times.
  • D: Toggle rectangular delete mode. Current MU discharge times inside the rectangle are removed.
  • W: Recompute the current MU filter and IPTS from the current discharge times.
  • E: Reset the current plot view.
  • Shift+Right or Shift+Left: Move to the next or previous MU.
  • Mouse wheel: Zoom in or out on the time axis around the cursor.

Updated variables

This UI updates only the manually edited discharge information. In particular, it can update MUPULSES when firings are added or removed, and IPTS when the W command recomputes the current MU source. It does not delete MUs marked with the checkbox, and it does not finalise derived fields such as SIL/ACCURACY or BINARY_MUS_FIRING after MU deletion. Those operations should be handled by the calling script, for example with the openhdemg library functions. For examples, see run_bss_mu_editor().

PARAMETER DESCRIPTION
emgfile

Decomposed openhdemg file.

TYPE: dict

e_w_sig

Already filtered, extended, and whitened EMG signal with shape (features, samples). It is used directly by the W command.

TYPE: array - like

refsig_channel

Reference signal channel to plot behind the discharge rate trace.

TYPE: int or str

ipts_transform

Non-linear transformation applied to the source recomputed with W.

TYPE: (None, s * abs(s)) DEFAULT: "None"

path_to_icon

Optional window icon path.

TYPE: str or None DEFAULT: None

parent

Parent widget.

TYPE: QWidget or None DEFAULT: None

get_results()

Return the edited EMG file and original MU indexes marked for deletion.


run_bss_mu_editor(emgfile, e_w_sig, refsig_channel, ipts_transform='s*abs(s)')

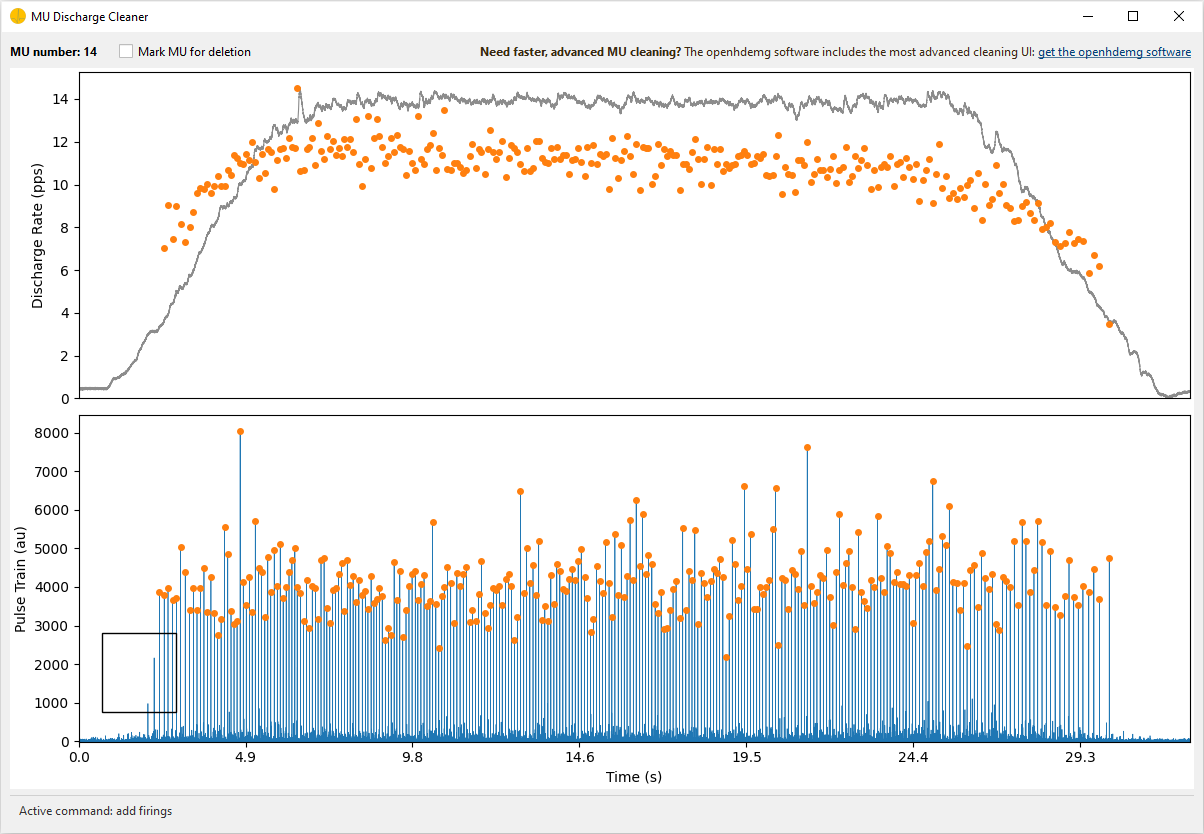
Open a portable modal UI for cleaning MU discharge selections obtained via convolutive blind source separation.

Close the window to return the edited EMG file. The caller is responsible for finalising and saving the returned object.

Advanced MU cleaning

Please note that the most advanced MU cleaning tools are available in the openhdemg software. You can find it at:

https://www.giacomovalli.com/openhdemg_software/

This UI allows to:

  • visually inspect the blind source separation discharge time selection.
  • visually inspect the source separation.
  • to add and delete firings.
  • mark MUs to delete.
  • update the separation filter based on the manually selected discharge times.

All the actions can be performed using the following shortcuts:

  • A: Toggle rectangular add mode. Samples of the selected IPTS trace inside the rectangle are added to the current MU discharge times.
  • D: Toggle rectangular delete mode. Current MU discharge times inside the rectangle are removed.
  • W: Recompute the current MU filter and IPTS from the current discharge times.
  • E: Reset the current plot view.
  • Shift+Right or Shift+Left: Move to the next or previous MU.
  • Mouse wheel: Zoom in or out on the time axis around the cursor.

Updated variables

This UI updates only the manually edited discharge information. In particular, it can update MUPULSES when firings are added or removed, and IPTS when the W command recomputes the current MU source. It does not delete MUs marked with the checkbox, and it does not finalise derived fields such as SIL/ACCURACY or BINARY_MUS_FIRING after MU deletion. Those operations should be handled by the calling script, for example with the openhdemg library functions. For examples, see run_bss_mu_editor().

PARAMETER DESCRIPTION
emgfile

Decomposed openhdemg file.

TYPE: dict

e_w_sig

Already filtered, extended, and whitened EMG signal with shape (features, samples). It is used directly by the W command.

TYPE: array - like

refsig_channel

Reference signal channel to plot behind the discharge rate trace.

TYPE: int or str

ipts_transform

Non-linear transformation applied to the source recomputed with W.

TYPE: (None, s * abs(s)) DEFAULT: "None"

RETURNS DESCRIPTION
edited_emgfile

The cleaned EMG file.

TYPE: dict

mus_to_delete

Original MU indexes marked for deletion. Delete them using delete_mus.

TYPE: list of int

Examples:

Prepare the preprocessed, extended, centered, and whitened signal in the calling script, then open the cleaning UI.

Import needed modules

>>> import numpy as np
>>> import pandas as pd
>>> import openhdemg.library as emg
>>> from openhdemg.ui import run_bss_mu_editor

Load openhdemg module decomposed using EMGDecomposer

>>> emgfile = emg.askloadmodule()

Extract needed decomposition parameters

>>> decomp_params = emgfile["DECOMPOSITION_PARAMETERS"]
>>> extension_factor = int(decomp_params["extension_factor"])
>>> eigenvalue_percentile = float(decomp_params["eigenvalue_percentile"])

Rebuild the same signal used by the decomposition preprocessing pipeline. The prepared signal will only be used for cleaning and will not update the original emgfile.

>>> working_emgfile = emgfile
>>> bandpass_params = decomp_params["bandpass_filtering"]
>>> if bandpass_params["enabled"] is True:
...     working_emgfile = emg.filter_rawemg(
...         emgfile=working_emgfile,
...         order=bandpass_params["order"],
...         lowcut=bandpass_params["lowcut"],
...         highcut=bandpass_params["highcut"],
...     )

Extract the EMG signal and store it as an array with channels as rows, samples as columns.

>>> emg_sig = working_emgfile["RAW_SIGNAL"].to_numpy(dtype=np.float64).T

Apply power-line harmonics removal when it was used during decomposition.

>>> powerline_params = decomp_params["powerline_harmonics"]
>>> if powerline_params["enabled"] is True:
...     emg_sig = emg.remove_powerline_harmonics(
...         sig=emg_sig,
...         fsamp=emgfile["FSAMP"],
...         notch_freq=powerline_params["notch_freq"],
...         notch_width=powerline_params["notch_width"],
...     )

Remove bad channels when this was used during decomposition.

>>> if decomp_params["exclude_bad_channels"] is True:
...     good_channels = emgfile.get("GOOD_CHANNELS", None)
...     if good_channels is not None:
...         good_idx = sorted(
...             int(ch) for ch, ok in good_channels.items() if ok
...         )
...         emg_sig = emg_sig[good_idx, :]

Prepare the extended, centered, and whitened signal.

>>> e_sig = emg.extend_emg_signal(
...     sig=emg_sig,
...     ext_fact=extension_factor,
... )
>>> e_sig = e_sig - np.mean(e_sig, axis=1, keepdims=True)
>>> e_w_sig = emg.svd_whitening(
...     e_sig=e_sig,
...     eigenvalue_percentile=eigenvalue_percentile,
... )

Align with the original sample indexes used by MUPULSES/IPTS.

>>> e_w_sig = np.pad(
...     e_w_sig,
...     ((0, 0), (extension_factor, 0)),
...     mode="constant",
...     constant_values=0,
... )

Start the editor

>>> edited_emgfile, mus_to_delete = run_bss_mu_editor(
...     emgfile=emgfile,
...     e_w_sig=e_w_sig,
...     refsig_channel=0,
... )

Once editing is completed, delete MUs marked in the UI

>>> if mus_to_delete:
...     edited_emgfile = emg.delete_mus(
...         edited_emgfile,
...         munumber=mus_to_delete,
...         if_single_mu="remove",
...     )

Also check for duplicate MUs that might have emerged from manual editing, if duplicate removal is enabled in the decomposition metadata.

>>> duplicate_params = decomp_params["duplicate_removal"]
>>> if duplicate_params["enabled"] is True:
...     edited_emgfile = emg.remove_duplicates_within(
...         emgfile=edited_emgfile,
...         correlation_max_lag=duplicate_params["correlation_max_lag"],
...         peak_window_half_width=duplicate_params["peak_window_half_width"],
...         duplicate_threshold=duplicate_params["duplicate_threshold"],
...         which=duplicate_params["which"],
...     )

Recalculate SIL for all remaining MUs.

>>> sil_values = []
>>> for mu in range(edited_emgfile["NUMBER_OF_MUS"]):
...     sil = emg.compute_sil(
...         ipts=edited_emgfile["IPTS"][mu],
...         mupulses=edited_emgfile["MUPULSES"][mu],
...         compute_on_peaks_only=True,
...     )
...     sil_values.append(sil)
>>> edited_emgfile["ACCURACY"] = pd.DataFrame(sil_values)

Recalculate binary MU firings.

>>> edited_emgfile["BINARY_MUS_FIRING"] = emg.create_binary_firings(
...     emg_length=edited_emgfile["EMG_LENGTH"],
...     number_of_mus=edited_emgfile["NUMBER_OF_MUS"],
...     mupulses=edited_emgfile["MUPULSES"],
... )

Standardise emgfile dtypes

>>> edited_emgfile = emg.standardise_emgfile_dtypes(emgfile=edited_emgfile)

Save the cleaned emgfile

>>> emg.asksavemodule(emgfile=edited_emgfile)