Graphical Interface
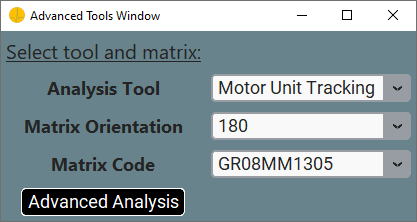
This is the toturial for the Advanced Tools in the openhdemg GUI. Great that you made it this far! In the next few sections we will take a look at the more advanced functions implemented in the GUI. But first of all, you need to click the Advanced Tools button in the main window of the GUI to get to the respective adavanced analysis. The Advanced Tools Window will open.
Please note, the Advanced Tools might not be available for all the files, as some of them might not have a sufficient number of electrodes to directly perform the advanced analyses. If you want to use the advanced tools anyway, you can still do so from the library.
So far, we have included four advanced analyses in the openhdemg GUI.
Motor Unit TrackingDuplicate RemovalConduction Velocity EstimationPersistent Inward Currents
For some of these analyses, the specification of a Matrix Code and a Matrix Orientation is required.
The Matrix Code must be specified according to the one you used during acquisition. So far, the implemented codes are:
- `Custom order`
- `None`
- `GR08MM1305`
- `GR04MM1305`
- `GR10MM0808`
In case you selected Custom order, you must also specify the custom order in the GUI settings. Please refer to this tutorial for further instructions on how to do so.
In case you selected None, the entrybox Rows, Columns will appear. Please specify the number of rows and columns of your used matrix since you now bypass included matrix codes. In example, specifying
means that your File has 65 channels organised over 13 rows and 5 columns.
The use of None is suggested anytime your loaded file contains already sorted EMG channels and you want to avoid further sorting.
If you selected one of the built-in sorting orders (e.g., GR08MM1305, GR04MM1305, GR10MM0808), you need to specify also the Orientation in row two and column four in the left side of the Plot Window. The Orientaion must match the one of your matrix during acquisition. You can find a reference image for the Orientation at the bottom in the right side of the Plot Window. Orientation is ignored when Matrix Code is None or Custom order.
Once you specified these parameter, you can click the Advaned Analysis button to start your analysis.
Motor Unit Tracking
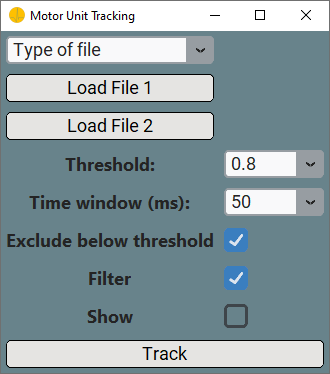
When you want to track MUs across two different files, you need to select the Motor Unit Tracking option and specify the Matrix Code and Matrix Orentation in the Advanced Tools Window. Once you clicked the Advanced Analysis button, the MUs Tracking Window will pop-up.
-
You need to specify the Type of file you want to track MUs across in the respective dropdown. The available filetypes are:
OPENHDEMG (emgfile or reference signal stored in .json format)CUSTOMCSV (custom data from a .csv file)OTB (.mat file exportable by OTBiolab+)DEMUSE (.mat file used in DEMUSE)
Each filetype corresponds to a distinct datatype that should match the file you want to analyse. So, select the Type of file corresponding to the type of your file. In case you selected OTB, specify the extension factor in the dropdown.
-
Load the files according to specified Type of fileusing the Load File 1 and Load File 2 buttons.
-
Select the minimum cross-correlation value to consider two MUs to be the same in the Threshold dropdown.
-
Specify the timewindow across which you want the spike triggered average to be computed in the Timewindow dropdown.
-
Select whether to exclude results with cross-correlation below specified Threshold by ticking the Exclude below threshold checkbox.
-
If you select the Filter checkbox, only the match with the highest cross-correlation is returned when the same MU has a match of cross-correlation > Threshold with multiple MUs.
-
The Show checkbox indicates whether to plot the spike triggered average of pairs of MUs with cross-correlation above Threshold.
-
By clicking the Track button, you can start the analysis. The tracking results will be displayed in the MUs Tracking Result output in the right side of the MUs Tracking Window.
Duplicate Removal
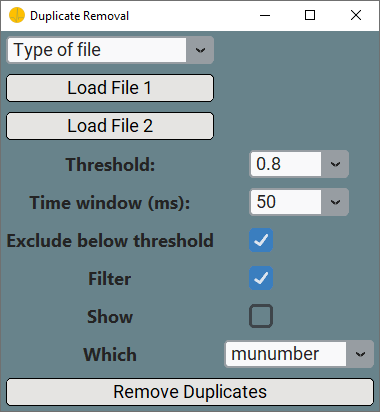
When you want to remove MUs duplicates across different files, you need to select the Duplicate Removal options and specify the Matrix Code and Matrix Orentation in the Advanced Tools Window. Once you clicked the Advanced Analysis button, the Duplicate Removal Window will pop-up. Duplicate Removal requires similar input as Motor Unit Tracking, so please take a look at the Motor Unit Tracking section. However, you need to do two more things.
-
You should specify How to remove the duplicated MUs in the Which dropdown. You can choose between
- munumber: Duplicated MUs are removed from the file with more MUs.
- accuracy: The MU with the lowest accuracy score is removed.
-
By clicking the Remove Duplicates button, you start the removal process.
-
Specify a filename and location to save the file(s) with duplicates removed in a .json format.
Conduction Velocity
Prior to calculation of the Conduction Velocity you need to load a file in the main window of the GUI. Take a look at the intro section. Once you have done this, open the Advanced Tool Window using the Advanced Analaysis button.
-
Select Conduction Velocity in the Analysis Tool dropdown, decide on the Matrix Orientation and Matrix Code as described above.
-
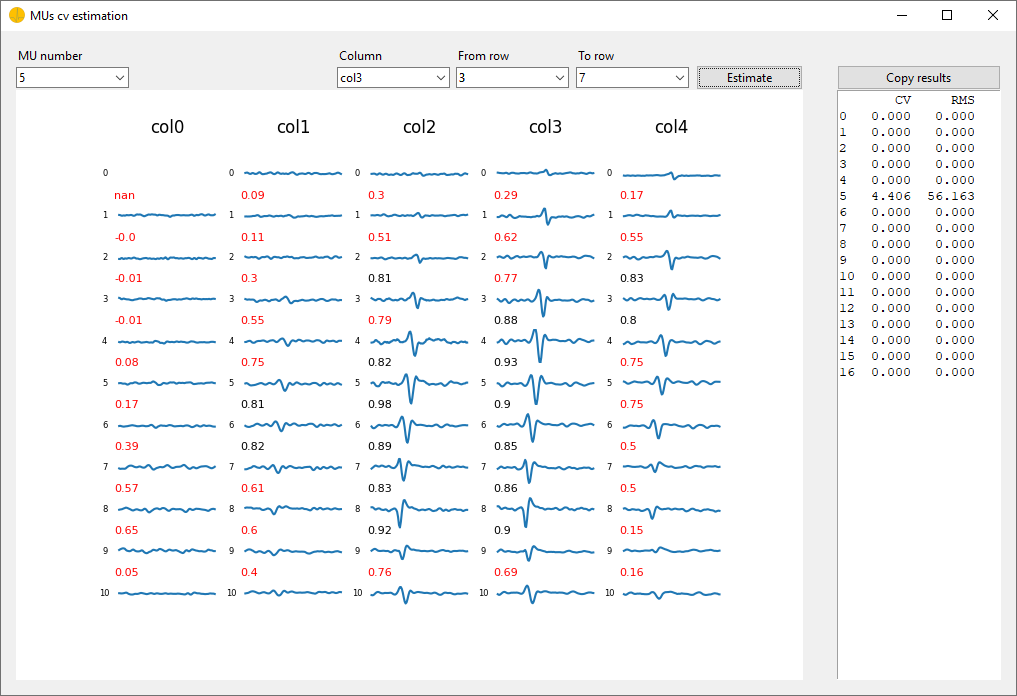
Click the Advanced Analysis button to start the calculation of the Conduction Velocity. The MUs cv estimation window will pop up.
-
In the top left of the MUs cv estimation window select the MU for which you want to calculate the conduction velocity using the MU Number dropdown.
-
In the top middle of the window select the column for which you want to calculate the conduction velocity choosing from the Column dropdown.
-
In the top right of the window select the rows for which you want to calculate the conduction velocity using the From row and To row dropdown. For example, if you want to calculate the conduction velocity from row 3 to 7, select
-
Click the Estimate button to start the calculation for the respective column and rows. The results will be displayed on the right side of the MUs cv estimation window.
-
You can copy the estimation results using the Copy Results button for futher analysis. The results are copied in the clipboard and can be pasted into any .csv (Excel).
We are now at the end of describing the advanced functions included in the openhdemg GUI. If you want to take a look at more basic stuff, check out the basic.
Persistent Inward Currents
When you want to estimate Persistent Inward Currents, you need to select the Persistent Inward Currents option. In this case, Matrix Code and Matrix Orentation will be locked, as these are not needed for the analysis. Once you clicked the Advanced Analysis button, the Persistent Inward Currents Window will pop-up.
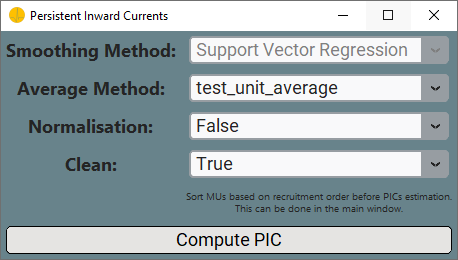
Please note that it is suggested to sort the MUs based on recruitment order before performing the PICs estimation. This can be done in the main GUI window.
-
In row 1 of this window you can select the smoothing tecnique to adopt (at the time of writing, only the Support Vector Regression is available, but more are under development).
-
Select the Average Method to use for test MU deltaF value.
-
Select the method for deltaF Normalisation.
-
Select the Clean option if you want to remove values that do not meet exclusion criteria.
-
By clicking the Compute PIC button, you can start the analysis. The results will be displayed in the right side of the Persistent Inward Currents Window.
More questions?
We hope that this tutorial was useful. If you need any additional information, do not hesitate to read the answers or ask a question in the openhdemg discussion section. If you are not familiar with GitHub discussions, please read this post. This will allow the openhdemg community to answer your questions.
Moreover, if you noticed an error that was not properly catched by the GUI, please report the issue.